Advanced Tricks Edit Command in Your Editor Ctrl+X, Ctrl+E - Open current command in your default editor (usually vim or nano)
$ # Press Ctrl+X then Ctrl+E # Your editor opens with the command # Edit it, save, and close # The edited command runs Real use case: You’re building a complex command with lots of flags. Instead of fighting with the one-line editor, pop it into vim, format it nicely, then run it.
Why Learn Commandline Shortcuts? If you’re spending any amount of time in the terminal, learning shortcuts can potentially save you hours in the future. Most people know the arrow keys and backspace, but bash has decades of shortcuts built in that almost nobody uses.
I’ve been using Linux since 2011, and I’m still discovering new ones. Here are the ones I actually use daily, plus some obscure gems.
Navigation Shortcuts Jump to Beginning or End of Line Ctrl+A - Jump to the beginning of the line
My ranger config can be found here.
Here is a quick write up of a program that I have heard of before and installed but never found it necessary in my work flow. I have and still am happy to move around in the command line like I have been for the past ten years plus but now after finding a good reason to try it out this time since I have been moving around a lot more in the command line from writing blogs to notes to novels, and everything in between, I felt like my work flow wasn’t as optimized nor as speedy as it could be.
Building on the Basics Now that we know how to open a file, edit it, move around in it, and save it, let us now look into how we can tweak it. My post to part 1 of vim basics can be found here: https://blog.lanlocked.xyz/post/vim-basics-part-1/. Part 2 can be found here: https://blog.lanlocked.xyz/post/vim-basics-part-2.
In this part, we’ll cover visual mode, text objects (which will change how you think about editing), and then dive into customizing vim with your .
Welcome Back In Part 1, we covered the basics of opening vim, understanding normal and insert modes, and moving around with the hjkl keys. If you haven’t read that yet, I’d recommend starting there as we’ll build on those concepts.
Now it’s time to tackle what might be the most infamous aspect of vim: how to actually save and exit the program. We’ll also dive into some useful editing commands that will start to show you why vim users are so passionate about this editor.
Getting to know vim If you are looking for a way to get more efficient at editing configs and text then vim is what you are wanting. Even at its most basic interface with no added plugins, vim can help you manipulate a file with its efficient modes and commands.
vim is not the easiest to learn, especially for beginners where often newbies trying it out for the first time find they are not even able to exit the program.
I have been using MikroTik (my-crow-tick or me-crow-teek), or however you want to pronounce it, for several years now and I just keep coming back to using it. MikroTik, for the uninitiated, can be quite a difficult system to learn and use. There are quite a bit of gotchas that can bite you along the way and even now, some things can still trip me up if I’m not paying attention to what I’m doing.
I wanted to show a little firewall rule that I setup that will allow an entity to attempt to login via SSH or Winbox and have them locked out for 21 days after so many attempts. You can tweak this to allow for more attempts and or have them locked out indefinably. This might be considered a tar pit for those that know that term except this is a manual tar pit that acts a little differently than the one MikroTik has built-in.
After much research and trial and error I have found the gpodder implementation to be very terrible. The only known way to get synchronzation across devices is to setup a nextcloud server and install the plugin/addin gpodder. The other ways that I have tested but could not get any to work due to broken links and or not enough information are with micro-gpodder-server and gpodder2go. Both failed miserably.
The official link/website and how-to from gpodder.
I tried to use sed to rename filenames but found it rather cumbersome. sed is great when used to edit the content of a file which you can find some examples I created here, but I found this handy program that can do the same but for filenames instead.
Installed on my Arch, BTW, system I already had the program called rename which is not the same as the one we need called perl-rename.
Due to the higher complexities of running a modern website or blog securely or rather, for making it easier for people via CloudFlare and the like, I have found that when one of those main sites are down, again like CloudFlare, sites that rely on their DNS redirecting and whatnot, go down too. Many blogs that I follow are starting to jump on that band-wagon which is annoying since it can be quite a bit of time for a site to return to working order whether it was on CloudFlare’s side or the blog owner.
vim substitution is one tool any advanced vim user should know. Basically, vim substitution is similar to search and replace used on other file editors but vim goes much further than just searching and replacing files and characters. For anyone who creates bash scripts and edits a ton of config files like myself, will attest to the need to comment and uncomment many lines at a time.
I’ll start with the basic uses of substitution and go into the more meaty commands as we go along.
After using i3-wm, formally known as i3-gaps, for several years on my personal workstation I have not really needed to use the i3lock features that often due to my workstation being in my office where no one else touches it. They wouldn’t know how to use it in they did try and mess with my workstation. But now that I am using my same i3 config across more systems including my work computer where I now use it manage and maintain the network and servers of my work, I began looking for ways to make my computer more secure.
The watch command is used when you want to have a program run every so many seconds that you define. I often use it to see the stream of files that are being transferred or for checking the status of scripts while I test them.
Running The Watch Command Here is a common way that I use watch after I have run rsync just to make sure things are going the way they should:
Mounting more than just the root partition at boot using LUKS/dm-crypt is a little more complicating than setting up just the one. Rather than just placing your UUID of the root partition in the /etc/default/grub file you have to go through several more steps. Follow along as I describe a simple way to get more than one partitions/disks mounted at boot time.
When you might not want mount-encrypted drives at boot.
After an exhaustive exercise of finger tapping on my keyboard and several attempts to clear my head by walking away from the computer, I have finally setup a Gitea instance. Following the how-tos online seemed simple enough. Follow the steps, install a user, setup permissions, download a file and bam you are good to go. But that is the furthest from the truth for my experience. I have followed what seemed to be ten different how-tos that somehow seem to differ even between the same distro install.
In my ever continuing effort to use the command-line more, one tool that allows any command-line-junky to view their network traffic in real time is called bmon. It can be installed via any package manager: ie, apt, pacman, portage, etc.
I have found a fancy way to test the speeds of my media devices by using the dd tool. For those that don’t know what the dd command stands for or does, Disk/data Duplicator is a tool that was used in the old BSD/AT&T days but still has great functionality today.
Mostly dd is used for writing a .iso to a USB to be used to boot into a Linux distro or what have you.
I normally don’t create nor use tons of aliases in my .bashrc file. I have a few that tweak how grep and ls show color in the prompt and others where I can change directory by typing .. or … which perform cd ../ and cd ../../ respectively, but because of my roaming nature, where I bounce around from one computer/server to another where it may or may not have a configured .
After I recently setup rsnapshot as my backup solution, which can be found here https://blog.wretchednet.com/post/rsnapshot/ I started looking at options on how to remotely backup my workstation. I used Backblaze for a while but I wasn’t too happy with their interface. I looked at getting another cloud backup solutions but each one would either cost quite a bit more per month and or had similar or worse user interfaces.
I decided to go with Google Drive since I’ve had it for years, its free for up to 15 GB, and the interface is simple to index and use.
Creating a new git repo is a little more involved than one that is already setup but here are the simple steps to get one rolling. I prefer to use SSH over HTTPS due to security and ease of use from the command line.
Setup We need to first do a few things to make a commit as easy as possible.
Create a ssh key if you haven’t already. This will be placed in ~/.
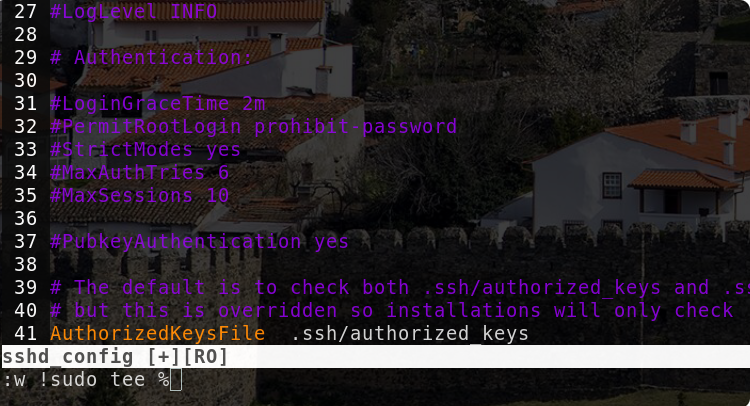
I have often opened a file which I did not first run as sudo in vim, edited the file, then to only find out that it is in read-only mode. I would then have to close the file then re-open it as superuser then make the changes needed. I found this to be very frustrating and found out there are several ways to get the file edited by inserting commands in command-mode using vim.